
To add a product variant click the “Add New Variant” button:
The add product variant screen will be displayed as follows:
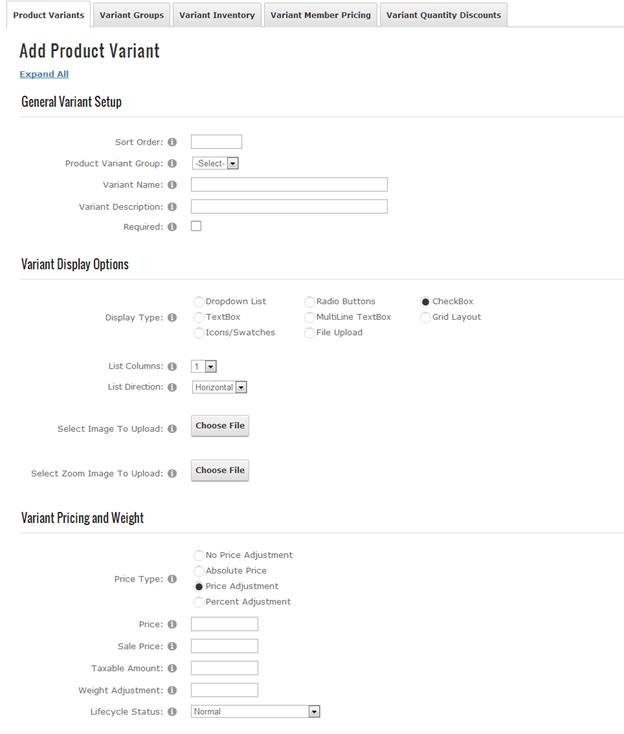
Simply start entering your product variant information into the text boxes and selecting the variant options you want from the checkboxes and radio buttons and click the “Add New Product Variant” button to save.
Sort Order - The sort order field controls the order in which the product variants are displayed in the product catalog. Enter a numeric number from 1 to 999. The products variants will be sorted in ascending order by the sort order field.
Product Variant Group – The variant group is the “type” of product variant you are creating for a product. For example, size and color are examples of variant groups. The variant group field you define be will displayed as a label next the product variant on the product detail screen. For more information about create product variant groups click here.
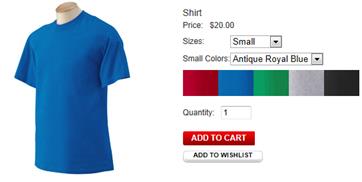
Variant Name – The variant name is the product variants or “option” that is displayed on the product detail page of the cart. For example, if you are selling shirts then small, medium and large are examples of variant names.
Product Variant SKU - Enter your product variant SKU in this field. The product variant SKU is typically a unique number that identifies your product for inventory purposes.
Required – When the “Required” checkbox is checked the user will be required to choose a product variant before adding a product to the cart.
Display Types:
The display type is the type of control the cart will use to display product variants on the Product Details page.
The following options are for product variant display types:
1. Dropdown List – Allows Users to make Variant selections of the associated Variant Group in a dropdown list for users from.
2. Radio buttons – Displays Variants of the associated Variant Group as a radio button for users to make a selection from.
o List Columns – Formats the radio button or checkbox list single column or multiple column layouts.
o List Direction – Formats the radio button or checkbox list in either a vertical or horizontal direction.
3. Checkbox – Displays Variants of the associated Variant Group as a checkbox for users to make a selection from.
o List Columns – Formats the radio button or checkbox list single column or multiple column layouts.
o List Direction – Formats the radio button or checkbox list in either a vertical or horizontal direction.
4. Grid Layout – Displays Variants of the associated Variant Group in grid format with the following fields:
o Description (Variant Name)
o In Stock (Quantity On Hand)
o Price
o Sale Price (if any)
o Buy (Quantity)
5. Textbox – Displays Variant as a textbox. Currently one textbox is supported per Variant Group.
Variants defined as textboxes allow the user could enter a value into the textbox that can be used to calculate the total price of the product. For example, the price of fiber optic cable is $5/foot. If the user entered 100 into the textbox the price of the product would be calculated as follows:
Product Price + (Variant Price x Value entered by user)
6. Multiline Textbox – Displays Variant as a multiline textbox. Currently one multiline textbox is supported per Variant Group
7. Icons/Swatches - Displays a dropdown list and clickable icon image which changes the Main Product Image of the variant.
•Icon Custom Image Options:
o No Custom Image Options – No Image options will be displayed
o Add Icon On Left – Displays Uploaded Icon on left side of the image
o Add Icon On Right - Displays Uploaded Icon on right side of the image
o Add Icon On Left and Right - Displays Uploaded Icon on both the left and right side of the image
For example, if you are selling shirts this feature will allow you to define a set of "Color Swatches" and when the user clicks on one of the swatches the main product image will change to the color selected by the user.
8. File Upload – Allows your users the option to upload files.
Variant Images – Upload and associate an image with your product variant. This will allow the user to rotate through your product images when they change the product variant on the product detail page of the cart.
Enter Prices as Adjustments – The price adjustment field allows for the adjustment of the product price based on the product variant the user selects. For example, the price of a shirt is 20 dollars and you enter the following price adjustments:
•Small - $0
•Medium - $5
•Large - $10
The net price of the shirt would be the following:
•Small - $20
•Medium - $25
•Large - $30
Price– Enter the price for the variant. The variant price can be entered as the actual price of the product or a price adjustment. If you enter price as an adjustment be sure to check the price adjustment checkbox. Variants defined as textboxes allow the user to enter a value into the textbox that can be used to calculate the total price of the product.
Sale Price – Enter the sale price for the variant. The variant sale price can be entered as the actual sale price of the product or a sale price adjustment. If you enter price as an adjustment be sure to check the price adjustment checkbox. Variants defined as textboxes allow the user to enter a value into the textbox that can be used to calculate the total price of the product.
Weight Adjustment - The weight adjustment field allows for the adjustment of the product weight based on the product variant the user selects. For example, if you have products that are different sizes and the large size weighs more you can enter a weight adjustment. The product weight is used in calculating the total shipping cost of the customer’s order.
Lifecycle Status – Product Lifecycle is represented by the sales status of a product variant. The following lifecycle statuses are available:
•Coming Soon
•In Stores Now
•New
•Sale
•Reduced
•Clearance
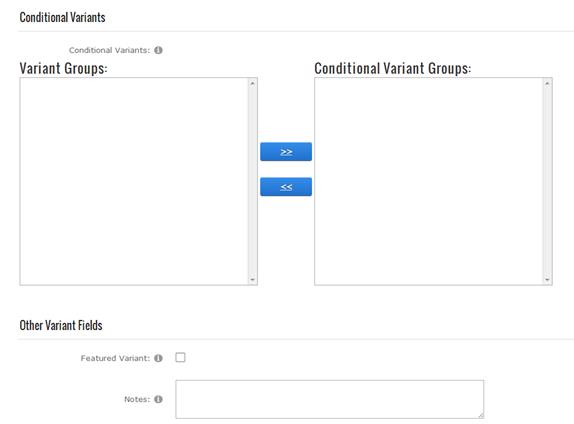
Conditional Group – The conditional variant group allows you to define a variant group to be dynamically displayed based on the selected value of a regular variant. To configure a conditional variant group navigate to the variant group setup screen and enter your variant group name and check the “Hide” checkbox. When a conditional group is configured for a variant with the hide checkbox checked, by default, it will not display on the product detail page until the value of the variant that it is conditional upon is selected.
Featured Variant – When checked displays featured variant in the Smith Slider module featured tab.
Notes - Enter product variant notes in this field.
For more information about styling product variants in the front end user display using the module.css Click here