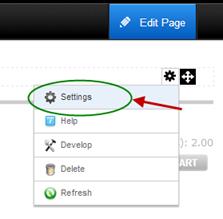
To configure the Product Detail module settings hover your mouse over the “Manage” button at the top of the Product Details module container and choose settings.
Then select the Smith Product Detail Settings Tab.
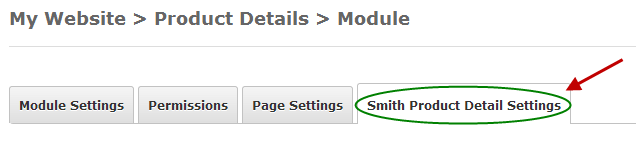
The following settings allow you to customize the Product Detail page of the cart checkout.
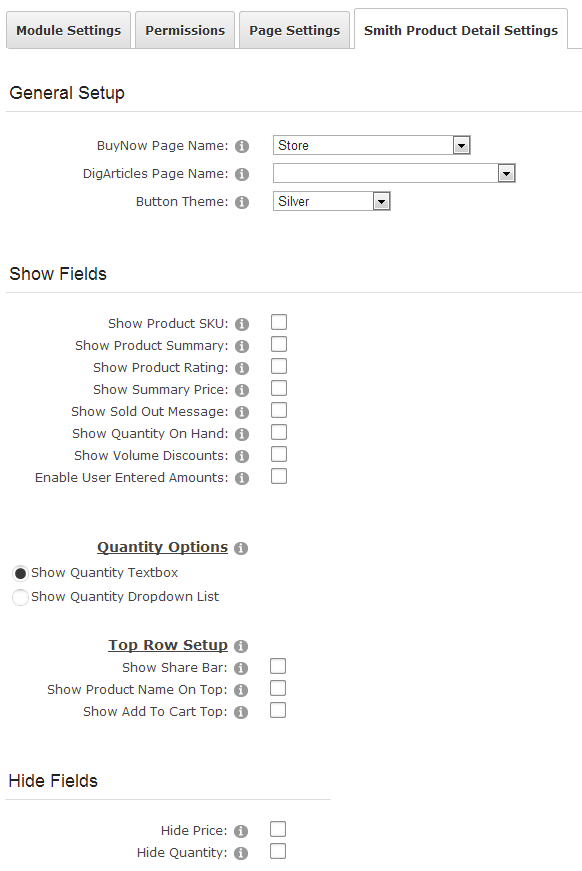
BuyNow Page Name– Select the page where you have added the BuyNow module. This tells the Product Detail module which page to navigate to when the user clicks continue shopping or add to cart.
Button Theme – The cart comes with the following eleven professionally designed button themes:
•Azure
•Black
•Blue
•Brown
•Forest Green
•Green
•Orange
•Red
•Silver
•Yellow
•Pink
•And more!
Select the button theme that
matches your portal skin the best.
Show Product Sku - If checked, the product sku field will be displayed on the product detail page.
Show Product Summary - If checked, the product summary field will be displayed on the product detail page.
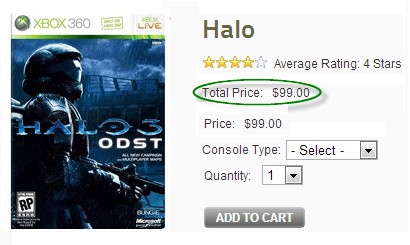
Show Product Rating – Check this box if you would like to display product ratings above the price on the product detail page, seen below.
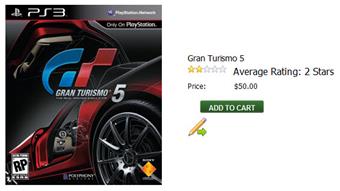
Show Summary Price – Check this box to display the total price of the product in additional to the unit cost that is normally displayed on the product details page. The calculation for the total price field is as follows:
Total Price = Unit Cost * Quantity
When “Show Summary Price” is checked the total price is displayed as depicted in the following screen shot:
Show Sold Out Message - If checked, a sold out message will be displayed on the product detail page when quantity on hand for the product is zero. The following is a screen shot of the sold message on the product details page:

Figure 29 - Product Details page Sold Out Message
Show Quantity On Hand – Check this checkbox to display the quantity on hand on the product details page.
User Entered Amounts -- Check this box if you would for the user to be able to enter a price for your product or service. This option is typically used for online bill payment or sites that collect online donations.
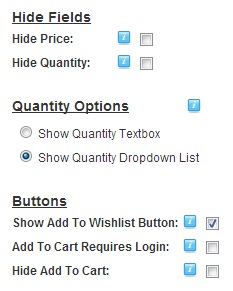
Hide Price – Check this box if you would like to hide the “Price” field on the Product Details page. This is useful if your business only sells to resellers that require prior approval before buying your products.
Hide Quantity – Check this box if you would like to hide the “Quantity” textbox on the Product Details page. This is useful if your business only sells to resellers that require prior approval before buying your products.
Quantity Options – Show quantity textbox displays a textbox for the user to enter the quantity of product they wish to order. Show quantity Dropdown List displays a dropdown list to the user to select the quantity they wish to order. To change the values in the quantity dropdown go to the Store Admin Menu and click the “Page Templates” button and edit the Product Detail page template.
Show Add to Wish list Button - When “Enable Wish List/Saved Cart” is checked in the cart settings the “Save Cart” and “View Saved Cart” buttons will be displayed on the cart screen.
Add To Cart Requires Login -- Check this box if you would like to require the user to login before adding items to the cart. If this box is checked and the user clicks the “Add To Cart” button on the product listing page they will be directed to the login page if they are not already logged in. The cart login page has two options for the user to choose from; new user and existing user. If the user already has an account and logs in they are directed to the step 1 of the checkout. If the user is a new user they are directed to the cart registration page. For more information on the Cart Registration page click here.
Hide Add to Cart – Check this box if you would like to hide the “Add to Cart” button on the product listing page and the product detail page. Hiding the “Add to Cart” button turns your store into a product catalog only and will not allow users to checkout and purchase product. This is useful if your business only sells to resellers that require prior approval before buying your products.
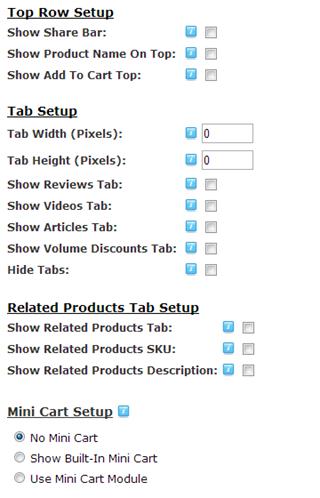
Show Share Bar – The share bar will allow you to share your products with popular social media applications. The Share Bar calls Facebook, Twitter and Google Plus API interfaces to send product information to the desired social media sites.
Show Product Name Top – Check this box to display an extra row at the top that will display the product name as a title.
Show Add to Cart Top – Check this box to display an extra row at the top that will display the Add To Cart button prominently.
Tab Width (Pixels) – Allows you to set the width of the tabbed product description on the Product Details page.
Tab Height (Pixels) – Allows you to set the height of the tabbed product description on the Product Details page.
Show Reviews Tab – Enables a tab to be created on the Product Details page which will allow customers to rate products and write reviews about products and displays information generated by the Smith Reviews Module. For more information on Smith Reviews, please click here.
If enabled, a new tab titled “Review” will be displayed on the Product Details page. Customers will be able to write down their experiences with the product for other customers. See the following screen shot of the customer reviews on the product details page:
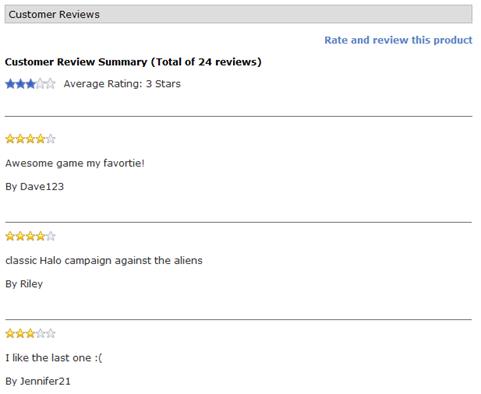
Figure 30 - Customer Reviews on Product Detail page
At the top of the customer reviews is a summary section showing total reviews and average rating for the product.
The “Rate and Review this product” link inside the “Reviews” tab allows a user to submit a product review. The user must be logged in to submit a product review, if the user is not logged in and they click the rate and review button they will be directed to the login page to login. When an authenticated user clicks the “Rate and Review this product” link the following screen is displayed:
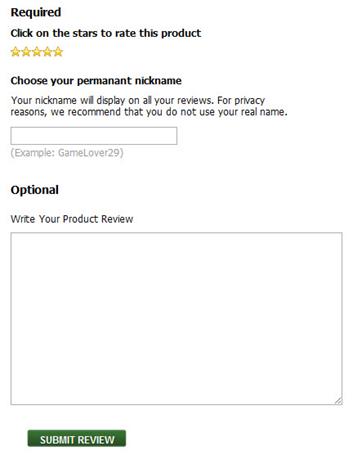
The user can hover their mouse over the stars and click the star to select a rating for the product. Fill in the rest of the screen and click the submit button to save the customer review. To manage customer reviews that have been submitted for products see the Manage Customer Reviews section below.
Show Videos Tab – Enables a tab to be created on the Product Details page that displays information generated by the Smith Videos Module. For more information on Smith Videos, please click here.
Show Articles Tab – Enables a tab to be created on the Product Details page that displays information generated by the Smith Articles Module. For more information on Smith Articles, please click here.
Hide Tabs – Check this box in order to hide the tabs and description section of the product details page.
Show Related Products Sku – When checked, the SKU is displayed for products in the Related Products tab on the Product Details page.
Show Related Products Description – When checked, the description is displayed in the related products tab.
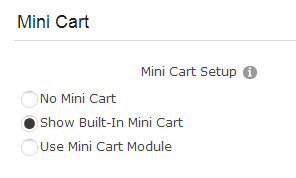
No Mini Cart (Default) – When selected no mini cart will be displayed on the product details page. When the user clicks the “add to cart” button the product will be added to the cart and the user will be redirected to the cart page.
Show Built In Mini Cart - When the show built in mini cart is checked, the mini cart will be displayed within the product details module. When the user clicks the “add to cart” button they will remain in the page and the item will be added to the mini cart. See the following screen shot:
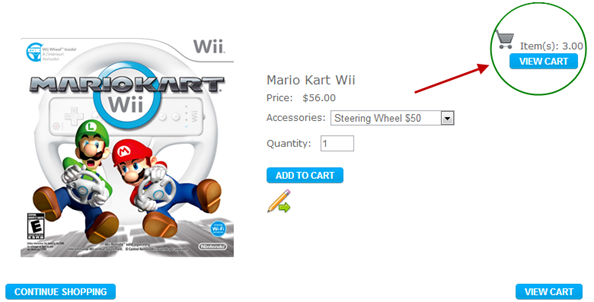
Figure 31 - Product Detail page with Mini Cart displayed
Use Mini Cart Module – This option requires the mini cart module to be added to the page. When “Use Mini Cart Module” is selected and the user clicks the add to cart button on the product details page they will remain in the page and the item will be added to the mini cart.
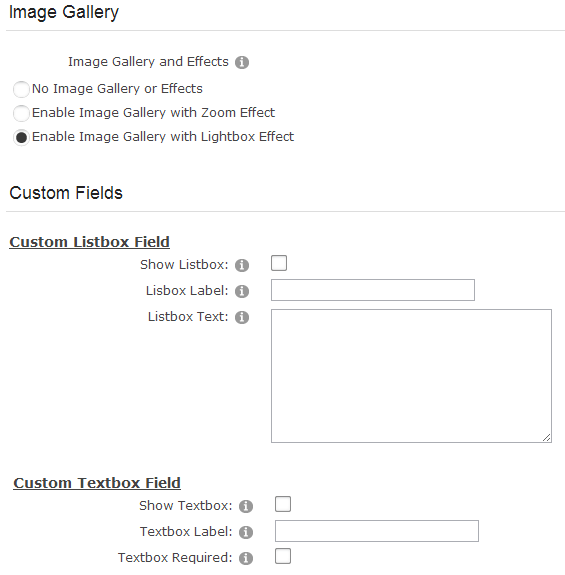
No Image Gallery or Effects – Select this option if you have not uploaded additional product photos from the product setup screen and do not want to use the lightbox or zoom effect for your product photos.
Enable Image Gallery with Zoom Effect – Select this option if you would like to enable the zoom effect on your product images.
Enable Image Gallery with Lightbox Effect – Select this option if you would like to enable the lightbox effect on your product images.
You can read more about the Image Gallery features below.
Show Listbox - When checked, a listbox will be displayed on the product detail page of the checkout. This listbox is useful for adding terms and conditions or custom content to the product detail page.
In order for the list box to be displayed on the product detail page you must go to the product setup and check the box titled "Show custom fields on product detail page" this allows you to turn on/off the list box by product.
Listbox Label – The List box label is the label that is displayed next to the custom list box displayed on the Product Details page.
Listbox Text – The List box Text is the text that is displayed in the custom list box displayed on the Product Details page.
Show Textbox - When enabled, a textbox will be displayed on the Product Details page. The user defined textbox is useful to customize your checkout and can be used to create any new field you choose. It is stored in the database for reference later on.
Textbox Label – Textbox label is the label that shows up on the product detail page of the checkout to the left of the custom text box.
Textbox Required – Check this box if you want to make the textbox required before the user can check out and make payment.
Show Volume Discounts in Tab – When this box is checked, customers will see the quantity pricing displayed in the tab.
Show Volume Discounts Below Price -- When this box is checked, customers will see the quantity pricing displayed below the standard price.
Enable Popup Window -
Show Quantity on Hand - Check this box if you would like to display the “Quantity on Hand” column on the cart screen during checkout. If the “Quantity on Hand” checkbox is not checked then the quantity on hand will be hidden.
Hide Sku – Check this box if you would not like to display the “Product Sku” column on the product matrix. If the “Hide Product Sku” checkbox is not checked then the product sku will be displayed.
Hide Add to Cart – Check this box if you would like to hide the “Add to Cart” button on the product detail page.
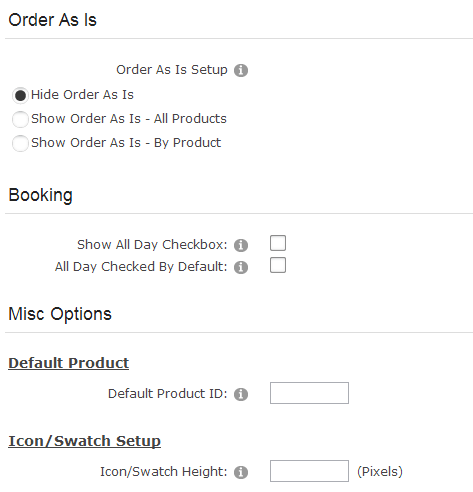
Hide Order As Is – Does not display the order “as-is” selection. Your users will have to configure the same settings for each purchase.
Show Order As Is – Allows user to re-order their last product configuration with a single button click.
§ If the user is logged in and has ordered the product before a button titled “Order As Is” will be displayed on the product details page
§ To re-order the last product configuration, the user would enter a quantity and click the "Order As Is" button and the product would be automatically added to their cart with the previous configuration they ordered.
§ If user has never ordered that product before, the Order As Is option would not display.
§ If the user is not logged in or has never ordered the product before, the "Order As Is" option would not display
Show Order As Is - By Product – Displays the order as is feature on the product details page that allows the user to select from a previous order and purchase the same configuration of a product. Specifically useful is you have products with a lot of variants. Will save the customer time when they order the same configuration of a product frequently.
Icon/Swatch Height – This field allows you to lock the pixel dimension for the icon displayed on the product details page.
Click here for more information about styling the product details page