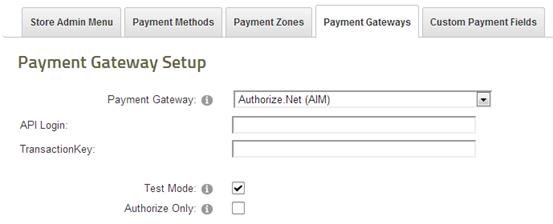
Selecting the Payment Gateways option from the Payment Setup screens menu bar will display the following:

Gateway – The Gateway dropdown list is where you select the gateway provider you are signed up for and wish to use with the SmithCart module. The gateway is the server and software programs that the SmithCart module sends credit card or eCheck (ACH) transaction to for processing. Select the gateway that applies to you.
If you do not have a payment gateway setup, please contact Smith Consulting at 949-829-3020 or complete the Payment Gateway Inquiry Form. We are a certified ISO and can setup and configure your cart with a payment gateway and merchant account quickly. If you are not ready to sign up for a payment gateway and just want to test the cart you select the “Manual” payment gateway option.
SmithCart is pre integrated with the following payment gateways:
•Amazon Checkout
•ANZ eGate (Bank hosted payment page)
•Authorize.Net
o Authorize.Net (AIM)
o Authorize.Net Hosted Payment Page (SIM)
o Authorize.Net Recurring Billing (ARB)
•Barclaycard
•BluePay
•CardFlex
•CBOSS - Bank Hosted
•Cybersource
•DPS PaymentExpress (Bank hosted payment page)
•Elavon
o Elavon Internet Secure
o Elavon Virtual Merchant (Formally Nova)
•E-xact (e-xact.com) – Canadian Payment Gateway
•eProcessing Network
•eWay (Australia - http://www.eway.com.au/)
•First Data Resources (FDR)
o First Data Global Gateway Connect PayPlus Payment Form
o First Data Global Gateway Linkpoint (32 bit only)
o First Data Global Connect Gateway Web Service (32 bit and 64 bit)
•Google Checkout
•Innovative (QuickBooks)
•Merchant e-Solutions
•MyGate (South Africa) - mygate.co.za
o MyGate Enterprise
o MyGate Enterprise with 3D-Secure
o MyGate Virtual (Bank hosted payment page)
•National Payment Provider
•NMI - Network Merchants, Inc.
•Paymex – New Zealand
•PayPal
o PayPal Website Payments Standard
o PayPal Website Payments Pro
o PayPal Payflow Pro
•PayWay by WestPac - payway.com.au (Bank hosted payment page)
•PayJuntion
•National Payment Provider (NPP)
•QuickBooks Merchant Services (QBMS)
•Realtors Electronic Commerce Network - realtor.org (Bank hosted payment page)
•Sage Payment Solutions
•Sage Pay
o Sage Pay (Bank hosted payment page)
o Sage Pay Direct
o Sage Pay Direct with 3D Secure
•SecurePay – Australia Post
•Setcom (Bank Hosted)
•SkipJack – Regular and Advanced Processor APIs
•Spanish Confederation Virtual POS (ceca.es) - Confederación Española de Cajas de Ahorros
•TransFirst
•UGSPAY
•USA ePay
•WorldPay
o Bank hosted payment page
o Direct with 3D Secure
•Custom Web Service
o Bank Hosted Payment Page
o Direct
•Manual Processing (No Gateway) – The “Manual” Payment Gateway option allows you to configure the module without real time credit card processing. If you choose this option the module stores the customer, order and credit card information in the database and you have the option to process the credit card transaction at a later time manually through your credit card terminal or virtual terminal.
For a full list of payment gateways integrated with SmithCart or for detail instructions on configuring your specific payment gateway please click the following link to view the SmithCart Payment Gateway Manual.
Test Mode - When checked allows you to submit test transactions to the payment gateway.
Authorize Only - Check this box if you want to your credit card transactions to authorize only and manually settle later. The reason you might want to setup credit card processing for “Authorize Only” is because some states require that you physically ship product before settling a credit card transaction. The “Authorize Only” feature is supported on the following payment gateways:
•Authorize.Net
•PayPal Standard
•PayPal Website Payments Pro
•PayPal Payflow Pro
•Sage Payment Solutions (SagePay)
•UGSPAY (ugspay.com)
How to settle Authorize Only credit card transactions:
1. Navigate to the store admin menu and click the “Manage Orders” button.
2. Click the select button next to the order to you wish to settle to load the order detail screen.
3. Click the “Settle Credit Card” button at the bottom of the screen and a settlement (capture) request will be sent to the payment gateway settling the credit card transaction on the order and depositing the money to your bank account. Currently, Authorize.Net is the only gateway supported using the settlement button on the manage order details page.
For more information on settling credit card transactions see the Manage Orders and the Manual Credit Settlement sections below.
Credit Card Options
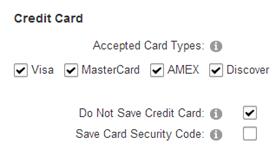
Accepted Card Types – This feature allows you to select what credit card types your store will accept (i.e. Visa, MasterCard, Discover and Amex). If the user enters a credit card type that is not enabled on the step 2 checkout screen, then the message “Visa is not an accepted card type.” is displayed to the user will not be allow the use to proceed to the next checkout screen unless they enter an allowed credit card type
Do Not Save Credit Card – By default the cart saves the credit card number in the database. Check this box if you do not want the cart to save the users credit card number to the database. This option is important if you are using a hosting service that is not PCI compliant and don’t want to worry about PCI.
Save Card Security Code – By default the credit card security code (CVV) that is collected on the step 2 checkout page is not stored in the database. Check this box if you want the cart to save the CVV code to the database.
Payment checkout Options
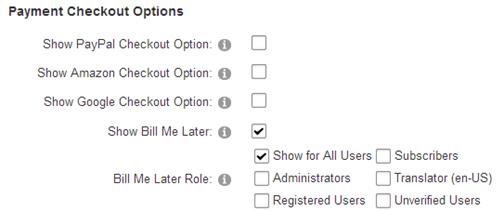
Show PayPal Checkout Option - When checked allows you to give your customers the option to checkout using PayPal standard in addition to the gateway option that you configured above under gateway settings.
Show Checkout by Amazon Option - When checked allows you to give your customers the option to checkout using Checkout by Amazon in addition to the gateway option that you configured above under gateway settings.
Show Google Checkout Option - When checked allows you to give your customers the option to checkout using Google Checkout in addition to the gateway option that you configured above under gateway settings.
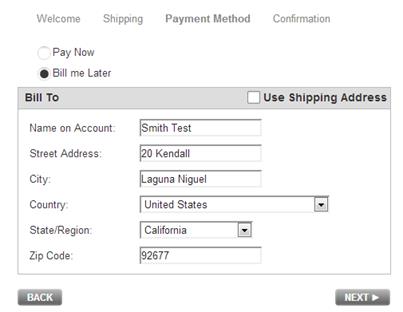
Show Bill Me Later – When “Show Bill Me Later” is checked a dropdown list will display all the roles defined in your portal and allows you to select the role that the Bill Me Later payment method will apply to. The user is presented with the option to pay now using a credit card or pay later.
Bill Me Later By Role - Displays a list of checkboxes for all the DNN roles configured in your portal.
The Bill Me Later by Role checkbox list allows you to select multiple roles to conditionally display the Bill Me Later payment option on the Step 2 cart checkout page. During checkout if the user is logged in and a member of the role you selected to view the Bill Me Later payment method then the cart will display the “Bill Me Later” checkout option on the step 2 checkout page.
See the following screen for an example:
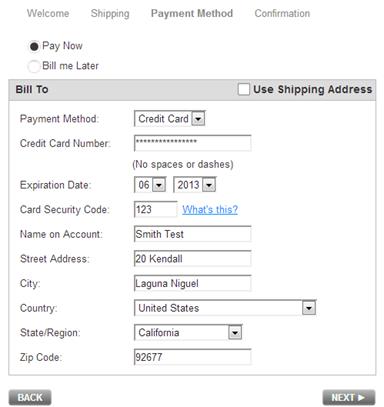
When the “Pay Now” option is selected the user enters credit card information normally.
When the user selects the “Bill Me Later” option the credit card fields are hidden and the user is able to checkout without entering a credit card.
