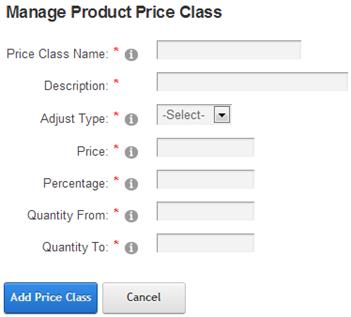
To configure Price Class Markup, a Price Class must be created. To create a new Price Class, click the “Price Class” tab at the top of the discount setup screen:

When you click the “Price Class Discounts” button the following screen will be displayed:

Figure 26 - Price Class Setup Screen
Please Note: To enable price class markups you will also need to enable the Price Class Markup setting on the Discount Setup screen for the markup to be applied.
Price Class Name – Enter the name of the Price Class that you wish to add.
Adjust Type – Select discount or mark up. Discount will discount the product by the amount or percent you enter. Mark up will increase the product by the amount or percent you enter.
Price – Enter the amount to discount or mark up a product.
Percentage – The percentage discount or mark up to apply to a product. In the product setup screen you can apply a price class to a product. Enter percentage without % sign (i.e. 20% is entered as 20)
Quantity From – Enter the quantity which defines the bottom of the price class range the cart will uses to calculate the discount applied the order.
Quantity To – Enter the quantity which defines the top of the price class range the cart will uses to calculate the discount applied the order.