
The following settings are available on the Product Setup screen:
Sort Order – The sort order field controls the order in which the products are displayed in the product catalog. Enter a numeric number from 1 to 999. The products will be sorted in ascending order by the sort order field.
Manufacturer - Select the manufacturer for your product from the dropdown list.
Product SKU – Enter your product sku or model number in this field. The product sku is typically a unique number that identifies your product for inventory purposes.
Product Name - Enter your product name in this field. The product name is displayed to the user in the product list, product detail and cart screens in the shopping cart.
Upload Primary Photo – The product photo uploaded here will be displayed to the user in the product details page. Additionally, the cart will automatically generate a thumbnail image displayed on the product listing page. The size of the thumbnail image is determined by the thumbnail height and width defined in the cart admin settings under the general cart configuration section. Click the browse button and a file dialog box will be displayed where you can navigate and select your product image you wish to upload. When you click the submit button at the bottom of the screen your image will be automatically upload to the server and a path to the image will be stored in the products table.
The cart supports any image size you upload and supports jpg, gif and png image types.

Unit Cost – The unit cost is the cost you want to charge for your product. Enter your product unit cost here. If you set the unit cost for a product to zero it will enable “free checkout”. Free checkout will allow the user to add the zero cost product to the cart and checkout, bypassing the payment page where the user normally enters their credit card number.
Price Units –The cost or price of an item based on the unit of measure. If you populate the unit price field, the price per unit is displayed next to the product price on the product details page and also in the variant matrix.
Sale Price – Provides the ability to set a sale price for a product. When sale price is populated the product listing and product detail pages on the front end cart will show the regular price with a strikethrough and the sale price will be displayed in red so the customer can see they are getting the product on sale.
Wholesale Price – Wholesale price will be used when calculating Sales Rep commissions.
Member Price – A special price offered only to those who are registered within your DNN store.
Price Class - Allows for mix and match pricing by “Price Class” which allows you to group products by price class and calculate quantity discounts by price class. If “Discount Price by Role” is configured in the cart and the user is a member of the role it would override price class discounting. For more information about setting up Price Classes see the Price Class Discounts section.
Tax Rate - Enter the Tax Rate that you want to charge for the specific product. If you enter a value in this textbox, the store will charge a flat tax rate (i.e. 7.75) on customer orders at the product level.
Summary – Enter a summary product description here.

Managing Product Description and Tabs:
SmithCart allows you to add up to five product descriptions for each product and also allows you to configure the tab name for each product description that is displayed on the product details page. The rich text editor is used for managing product descriptions enabling you to add regular text or html and upload photos and videos. See the following screen shot:
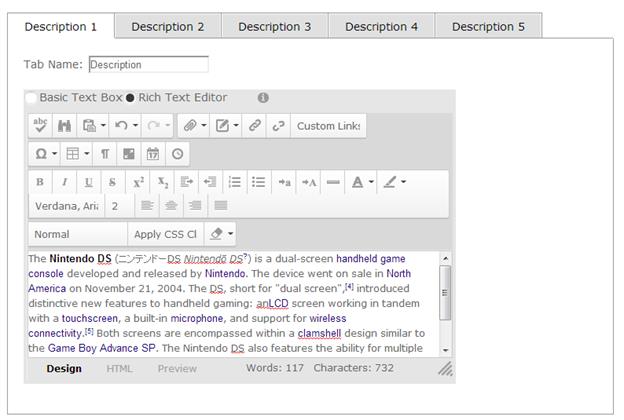
Tab Name 1-5 – Enter a tab label for the tabbed product description that is displayed on the product detail page. The product description tab control supports up to 5 tabs.
Description 1-5 – Enter a detailed product description using the rich text editor. HTML fully supported. The product description tab control supports up to 5 tabs.

Quantity on Hand – The quantity on hand field is used to manage your available inventory for your product. Enter the current available product quantity you have available in your inventory. Every time a user purchases a unit of product the quantity on hand is decremented by the number of units purchased. If a product has a quantity on hand of zero or if the customer tries to purchase a quantity of product that exceeds the available on had then the cart will display an out of stock message on the cart screen and not allow the user to proceed to checkout.
Weight – Enter your product weight here. The weight field can be entered in any unit of measure you like unless you have configured your store to use the “Real Time Shipping Calculator” in the BuyNow module settings. UPS, USPS, FedEx, Canada Post and Australia Post are the carriers used by the real time shipping calculator. If you have configured your store to use the real time shipping calculator, please be sure to enter the product weight in the Unit of Measure which is accepted by the Shipping Carrier selected. If you enter a weight greater than zero the shipping calculator will calculate real time shipping costs. If you enter zero for your product weight, no shipping will be charged for that product when checking out. If the weight of the all the products in the cart is zero, then the cart will not charge shipping costs.
Minimum Order Quantity - Enter the minimum number of units required to purchase this product. If user clicks add to cart with a quantity less than the min order quantity then the cart will display the message “Product XYZ” has a minimum order quantity of X units” and will not allow the product to be added to the cart until the user enters a quantity that meets the minimum order quantity threshold.
Maximum Order Quantity - Enter the maximum number of units required to purchase this product. If user clicks add to cart with a quantity greater than the max order quantity then the cart will display the message “Product XYZ” has a maximum order qty of X units” and will not allow the product to be added to the cart until the user enters a qty that meets the maximum order quantity threshold.
Product Dimensions – Specifies the dimensions for your product.
Please Note: This field is not currently used for shipping calculations.
Items in Sku – Items in Sku is used if you are bundling multiple products in a single sku. For example, a “Buy 2 Get 1 Free Deal”. It is used in conjunction with the coupon feature giving you the ability to control the coupon discount. For example, if you are running a promotion for 5 dollars off and individual products and the customer purchases the buy 2 get 1 free you can give them 10 dollars off. This feature allows you to use a single coupon codes for the single items or the bundled items.
Bin Location – A Bin is a container in the warehouse where inventory is stored. Bin location is an alphanumeric label where a particular inventory item is located in the warehouse.
Number of Boxes – The number of physical boxes for the product.
Please Note: This field is not currently used for shipping calculations.
Date Added to Inventory – Enter the date that the specified product became available for purchase through your storefront.
Lead Time - Enter the number of days before the product can be shipped. Used to indicate when a product is not "In Stock" or in the warehouse. If lead time is configured for a product when a user adds the item to the cart then the lead time will be added to cart after the product name and variants so the customer can see when the product is being shipped. The lead time by default is styled red and can be changed to any color by changing the "LeadTime" style in module.css.
Client – Enter the name of the client that is providing your storefront with the specified product.
Owner – Enter the name of the owner of the inventory.
Product Level Options
The following list of checkboxes allow for configuration of product level features in the cart and integration with other SmithCart modules:
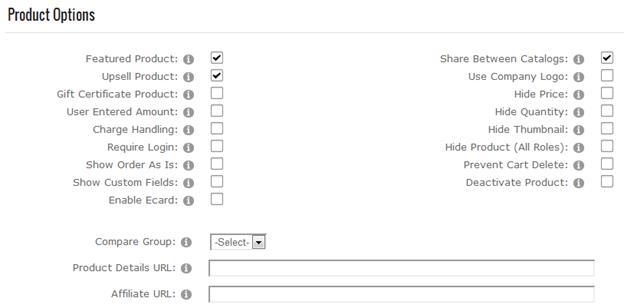
Figure 14 - Product Setup Screen
Featured Product – Allows the Product to be displayed in the Smith Featured Products module.
Upsell Product – Enables the upsell page during checkout. For more information on configuring the cart upsell checkout page feature Click here.
User Entered Amount – Enables user entered amounts for a product. When enabled, the user will be able to enter a price for your product. This option is typically used for online bill payment or sites that collect online donations.
Charge Handling – When “Charge Handling for Selected Products” and “Charge Handling” are checked the cart will apply the following rules for charging handling:
•If no items in the cart have “Charge Handling” checked in product setup then the cart will charge zero handling.
•If at least one product in the cart has “Charge Handling” checked then use the cart will apply the handling amount configured in the BuyNow settings handling setup section.
Note: This setting works in conjunction with “Charge Handling for Selected Products” setting.
Require Login – This setting will require the user to enter a user id and password before checking out. The require login checkbox in the add products screen is associated with a product or products and will only require the user to login if they have the products in their cart that require login. The cart settings screen also has a require login checkbox, when checked will require the user to create a login for any product they purchase.
Show Order As Is – Displays the order as is feature on the product details page that allows the user to select from a previous order and purchase the same configuration of a product. Specifically useful is you have products with a lot of variants. Will save the customer time when they order the same configuration of a product frequently.
Show Custom Fields – This checkbox allows you to show/hide the user defined fields on the product details page by product.
Share Products Between Catalogs – The “Share” checkbox only applies if you have added more than one cart module on different pages. This feature is used in situations where you want multiple product catalogs on different pages of your website. For example, if you are selling books and computers on your website and you wanted to have one page dedicated to books and another page dedicated to computers. If the share checkbox is checked for a particular product the product will be displayed in all product catalogs on any pages where you have added the shopping cart module. If the share checkbox is not checked then products added to your first cart module will remain separate from products added to your second cart module.
Multiple store support – SmithCart allows you to add the BuyNow module to multiple pages in your DNN portal The allows you to create of an unlimited number of stores on your Web site to offer different product selections, presentations, payment methods, shipping rates, and tax setup. This is useful for such purposes as building a members-only store or creating a discount store for clearance items. The share flag can be useful in this context to share products across multiple BuyNow modules eliminating the need to reenter your products in each BuyNow module.
Hide Price - When checked hides prices for a specific product. This is useful when setting up a product catalog only or setting products that need to be quoted. When hide price is checked the price of a product is replaced with “Request a Quote”.
Hide Quantity - When checked hides quantity for a specific product. This is useful when setting up a product catalog only or do not want the user to change the quantity for a product.
When hide price or hide quantity is checked the price will be removed on following screens and confirmation emails:
•Product listing page
•Product details page
•Cart page
•Confirmation page before payment
•Confirmation page after payment
•User and admin confirmation email
Hide Thumbnail - When checked the thumbnail image will not be displayed on the product listing page of the catalog.
Hide Product (All Roles) – Allows you to hide a product from the catalog for all DNN roles except the admin and host accounts.
Deactivate Product - Check this box to deactivate the product. When a product is deactivated it will not show up in the front end product catalog and will not be available for purchase.
Use Company Logo – Enables company logo uploaded by customer using the Smith Registration module to be used as the picture on a product.
Enable E-Card – When checked the e-card feature in the cart checkout will be enabled for the product. Allows the ability for buyers to be able to purchase items online and be able to either email a card to another user or print the card out and mail it themselves. E-Cards can include what was purchased in the html e-card popup and email.
Enable Booking - Enables booking in scheduling for the product. Allows the user to selects dates to schedule items from calendar and date picker on the Product Details page.
Product Details URL – Enter a custom URL in this field in order to override the default Product Details page.
Affiliate URL – Enter the URL of your affiliate network. When wishes to purchase the product the cart will redirect to the URL entered here.